Ionic 2 Firebase CRUD Example - Part 2
Previously I was writing about Ionic 2 Firebase CRUD tutorial that covers basic firebase setup, get data and push data to firebase. And next, we will continue with delete and update data.
1. Delete Data
To delete data from firebase is very easy, but we will cover some ionic 2 features that might be miss in the previous tutorial. One of them is the swipe to delete/edit feature, like native iOS. For this, we have to open file pages/contact/contact.html and add or edit this code.
<ion-content>
  <ion-list>
    <ion-list-header>My Contacts</ion-list-header>
    <ion-item-sliding *ngFor="let contact of contactList | async">
      <ion-item>
        <ion-icon name="book" danger item-left></ion-icon>
        <h2>{{contact.name}}</h2>
        <h3>Address: {{contact.address}}, {{contact.city}}</h3>
        <p>Phone: {{contact.phone}}</p>
      </ion-item>
      <ion-item-options>
        <button ion-button color="primary" icon-left (click)="editContact(contact)">
          <ion-icon name="ios-create"></ion-icon>
          Edit
        </button>
        <button ion-button color="danger" icon-left (click)="deleteContact(contact)">
          <ion-icon name="ios-trash"></ion-icon>
          Delete
        </button>
      </ion-item-options>
    </ion-item-sliding>
  </ion-list>
</ion-content>
You can see, the feature of swipe for delete/edit using ion-item-sliding and ion-item-option for putting delete and edit buttons. Edit button has to click action to call editContact function and delete has click action to call deleteContact.
Next, open pages/contact/contact.ts to add deleteContact and editContact function. Add this code below addContact function.
editContact(contact){
  console.log(contact);
  this.navCtrl.push(AddContactPage, {
    key: contact.$key,
    name: contact.name,
    address: contact.address,
    phone: contact.phone,
    city: contact.city
  });
}

deleteContact(contact) {
  this.contactList.remove(contact);
}
EditContact function will open AddContactPage for editing. DeleteContact function will directly delete or remove data in contactList. Let's try by running an app on the browser.
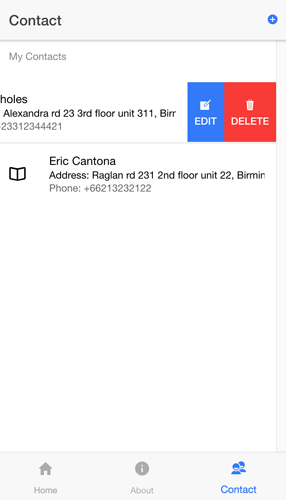
When you swipe a list item from right to left, delete and edit buttons will appear on right side of an item. You just click on delete button and it will directly delete item data on the list.
2. Edit Data
To edit data, do the same thing like previous but this time click on edit button it will show AddContactPage with a form filled by current data. Current data passed from contact together with navigation to AddContactPage.
editContact(contact){
  this.navCtrl.push(AddContactPage, {
    key: contact.$key,
    name: contact.name,
    address: contact.address,
    phone: contact.phone,
    city: contact.city
  });
}
Identification of contact that will be edited using $key. Now, open pages/add-contact/add-contact.ts and add initial contact object under contactList.
contactList: FirebaseListObservable<any>;
contact = {
  id: '',
  name: '',
  address: '',
  phone: '',
  city: ''
};
And fill contact object with params (NavParams) inside constructor.
constructor(public navCtrl: NavController, public af: AngularFire, public params: NavParams) {
  this.contactList = af.database.list('/contacts');
  this.contact.id = this.params.get('key');
  this.contact.name = this.params.get('name');
  this.contact.address = this.params.get('address');
  this.contact.phone = this.params.get('phone');
  this.contact.city = this.params.get('city');
}
Don't forget to edit addContact function. So, this function can use for an update or add contact data.
addContact(id, name, address, phone, city) {
  if(id) {
    this.contactList.update(id, {
      name: name,
      address: address,
      phone: phone,
      city: city
    }).then( newContact => {
      this.navCtrl.pop();
    }, error => {
      console.log(error);
    });
  } else {
    this.contactList.push({
      name: name,
      address: address,
      phone: phone,
      city: city
    }).then( newContact => {
      this.navCtrl.pop();
    }, error => {
        console.log(error);
    });
  }
}
Next, we have to edit pages/add-contact/add-contact.html too to initialize model for the form. So, our html code like this.
<ion-header>

  <ion-navbar>
    <ion-title>addContact</ion-title>
  </ion-navbar>

</ion-header>


<ion-content padding class="add-contact">
  <input type="hidden" [(ngModel)]="contact.id" />
  <ion-item>
    <ion-label stacked>Name</ion-label>
    <ion-input [(ngModel)]="contact.name" type="text" placeholder="Fill yor first and last name"></ion-input>
  </ion-item>
  <ion-item>
    <ion-label stacked>Address</ion-label>
    <ion-input [(ngModel)]="contact.address" type="text" placeholder="Fill your full address"></ion-input>
  </ion-item>
  <ion-item>
    <ion-label stacked>Phone</ion-label>
    <ion-input [(ngModel)]="contact.phone" type="text" placeholder="Fill your phone number"></ion-input>
  </ion-item>
  <ion-item>
    <ion-label stacked>City</ion-label>
    <ion-input [(ngModel)]="contact.city" type="text" placeholder="Fill your city"></ion-input>
  </ion-item>
  <button ion-button color="primary" (click)="addContact(contact.id, contact.name, contact.address, contact.phone, contact.city)"> <span *ngIf="contact.id">Update Contact</span><span *ngIf="!contact.id">Add Contact</span> </button>
</ion-content>
Finally, we are running our app and open in a browser. Swipe and choose edit, you will see the form filled with contact data.
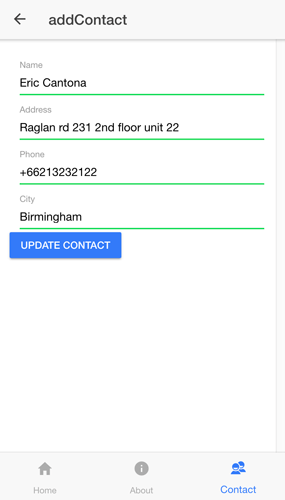
If we change data and click update, data will change immediately.
That it's for now. If you have problems to follow my tutorials, don't worry you will find source code in here.
Thanks.
0 comments