Posting data from Ionic 2 app to a PHP server
This is the simplest example which shows how to POST data from an Ionic 2 app to a PHP server.
Quickstart
To see it in action:
- Clone the finished project from Github
- Make sure you’ve got the newest Ionic beta CLI (see below for instructions)
- Run ionic serve
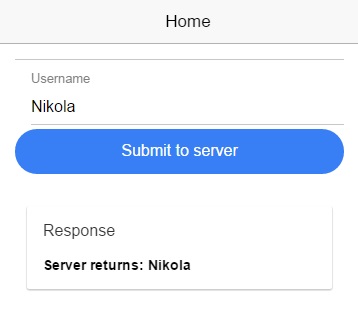
- You should see something like this:
If you want to make it work from your server:
- Make sure you’ve got the newest Ionic beta CLI (see below for instructions)
- Clone the finished project from Github
- Upload the PHP/api.php file to your server
- In the app/pages/home/home.js file adjust the link variable (line #18) to point to your server
- Run ionic serve
Getting started with Ionic 2
By now you probably have heard that Ionic is in beta for its version 2, which closely follows Angular 2.
You can find a lot more Ionic 2 related tutorials on my friend Gajotres site.
To install the Ionic SDK and create Ionic 2 projects, you need to install the latest beta release:
You don’t need to worry about this messing up your current ionic CLI since the beta release has all the functionality to work with both V1 and V2 projects.
Step by step on how to create this yourself from scratch
- Create a new blank Ionic project with:
- Copy the following code in app/pages/home/home.html file:Here you basically created a form with an username input field and with a button which acts as a submit button.As you can see, the syntax is a bit different since Ionic2 uses Angular2. Once the button is clicked AngularJS should handle it within the submit() function which we will define in our app/pages/home/home.js file (shown below).Input username uses the new syntax for ng-model as well, and it binds to the variable data.username, so that you can then use it in your submit() function (shown below).Also, components are a bit different in Ionic now, and I encourage you can take a look at the official documentation.
- On your server, create an api.php file with the following content:As you can see from the code, the first part is explained in detail in this StackOverflow question, and it basically solves the CORS issue that you would otherwise run into.The second part, explained in detail in this StackOverflow question, deals with the way you POST data from Ionic to your PHP server. The gist is that since we POSTed in a JSON format, we have to json_decode the data that comes to your PHP server.
- In app/pages/home/home.js file adjust the link variable to point to the file on your server
- In app/pages/home/home.js file copy the following content:Again, as I said, some (a lot) of things have changed in Angular 2, and at first glance you really may not like it (tbh, I know I didn’t). But, that will change with usage, so no worries.First thing that we do here is we import Page and Http components from Ionic and Angular, respectively. Then we’re setting the Page templateUrl to our home.html file.Inside the HomePage class we now have a constructor where we’re setting some default values. Important to note, see how we’re passing in Http via the constructor parameter. Again, I won’t go into details of using this, as I mentioned you can take a look at a lot more in depth tutorials on Gajotres.Inside the submit function we use the http service to post to our API endpoint with some data. Make note of how we use subscribe to handle data once it arrives.
- Run ionic serve from the root directory of your Ionic app
- Hope this tutorial helps you in starting your journey towards (Ionic + Angular)_2

0 comments